Keycloak Integrations
General
MapStore supports various Keycloak integration features:
- OpenID support: Allows to login to MapStore using a keycloak account.
- Single sign on: Enhances the OpenID support by detecting a session in the keycloak realm and automatically login/logout from MapStore
- Direct user integration: Enhances the OpenID support making MapStore use keycloak as unique Identity Manager System (IdM), replacing the MapStore DB with Keycloak REST API.
OpenID
Keycloak OpenID support allows to use a keycloak instance as Identity Provider (IdP) via OpenID Connect (OIDC), so that the user can login to MapStore using an existing account in keycloak.
You can find details about how to configure it in the dedicated "OpenID Connect" page section dedicated to keycloak
Single sign on integration
MapStore provides an integration with the keycloak Single Sign On (SSO) system, that allows to automatically login/logout in MapStore when you login/logout from another application in the same keycloak realm, an vice-versa.
In order to enable the SSO in keycloak you have to:
- Have already configured the openID for keycloak.
- Create a keycloak client in the same realm of openID integration above.
- Configure SSO in MapStore's
localConfig.json
Configure the OpenID integration
- See here openID integration.
Configure keycloak client
After configuring the open openID integration, you will have a keycloak client called mapstore-server.
In order to enable SSO you have to create another new Client on keycloak. In this guide we will name it mapstore-client.
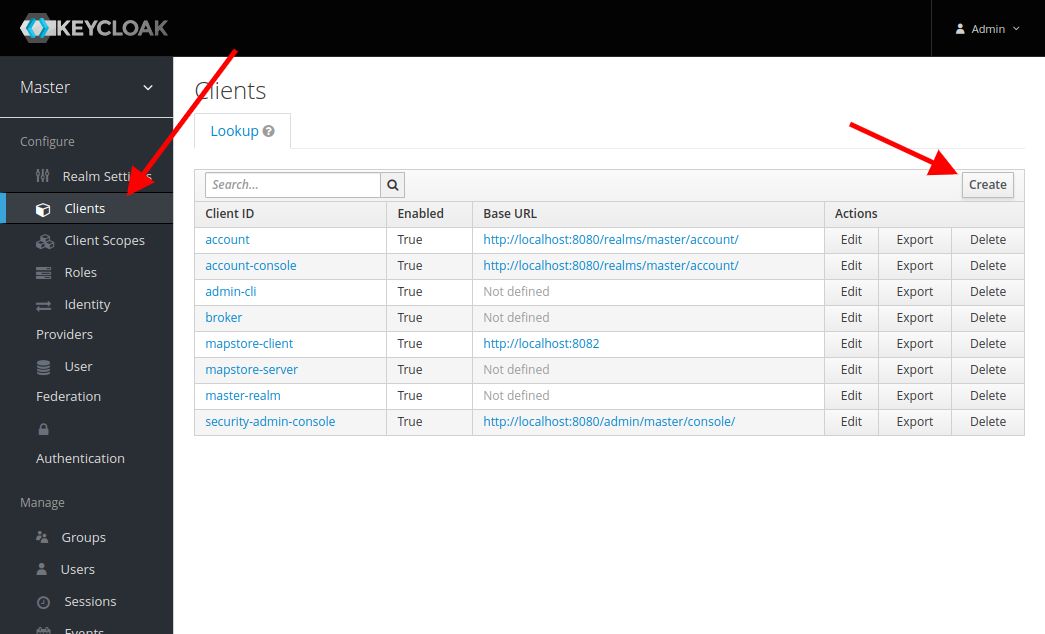
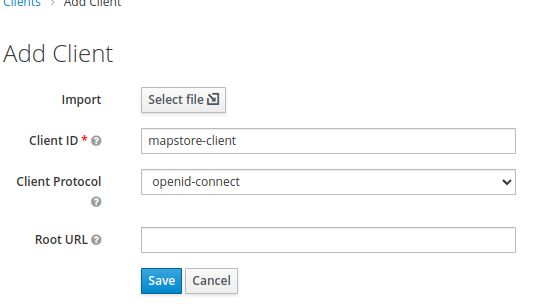
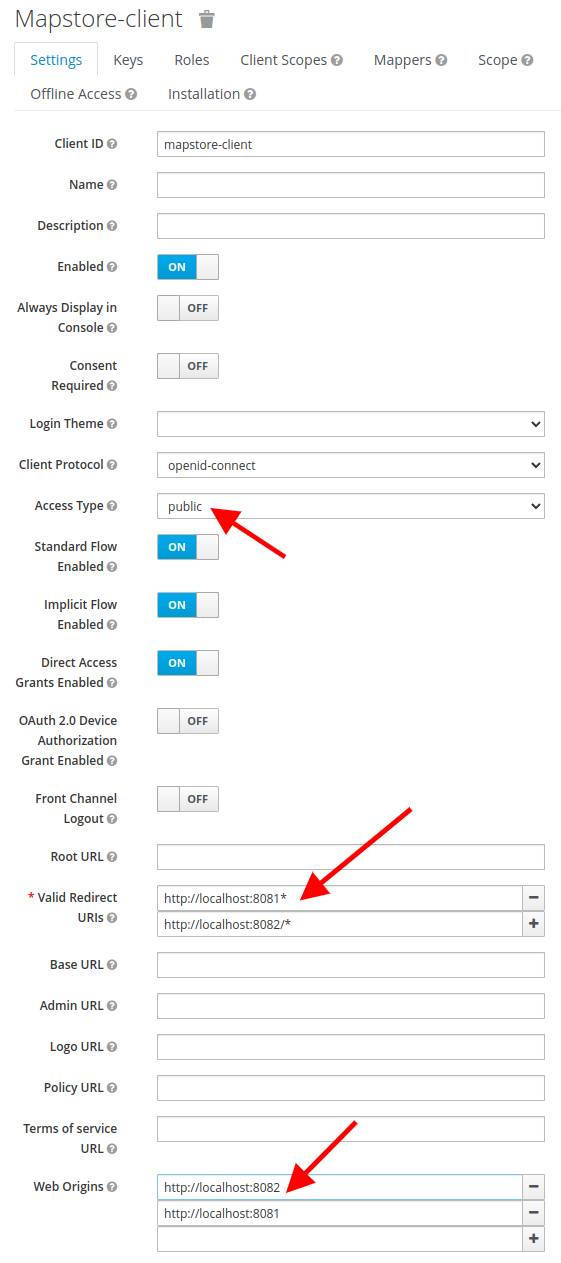
- Configure it as
Public - Insert in "Valid Redirect URIs" your MapStore base root, with a
*at the end (e.g.https://my.mapstore.site.com/mapstore/*) - Insert in "Web Origins" your MapStore base domain name. (e.g.
https://my.mapstore.site.com)
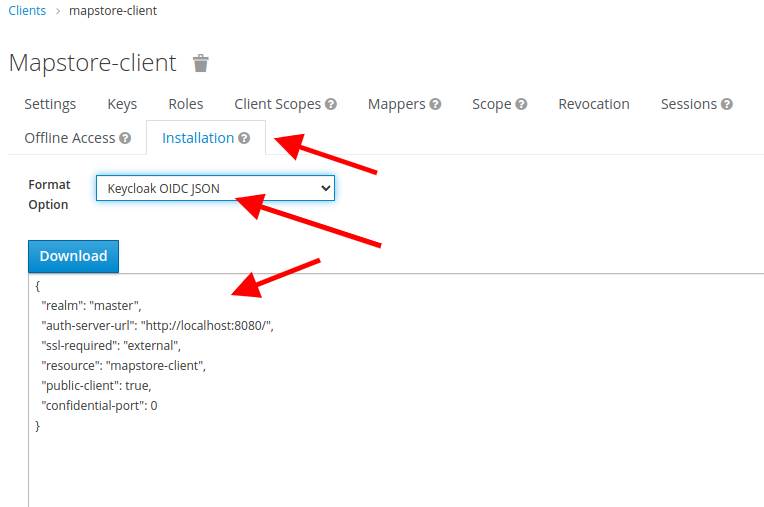
- Click on Save button, then open the Installation tab, select the
Keycloak OIDC JSONformat, and copy the JSON displayed below.
Configure SSO in MapStore
After configuring the open openID integration, you will have an entry named keycloak in authenticationProviders.
In this entry, you will have to add "sso":{"type":"keycloak"} and config: "<configuration coped from keycloak>".
e.g.
{
       "authenticationProviders": [
      {
        "type": "openID",
        "provider": "keycloak",
        "config": {
          "realm": "master",
          "auth-server-url": "http://localhost:8080/",
          "ssl-required": "external",
          "resource": "mapstore-client",
          "public-client": true,
          "confidential-port": 0
        },
        "sso": {
          "type": "keycloak"
        }
      }
    ],
}
Here implementation details about keycloak login workflow.
Direct user integration
By default MapStore can integrate openID login with Keycloak and also supports integration with Keycloak SSO.
By default users that login with Keycloak are created on the database and their Keycloak roles inserted as MapStore UserGroup. Anyway MapStore can interact with Keycloak REST API to provide a direct integration without persisting anything on the MapStore's database. This provides a stricter integration between the applications, allowing the assignment of roles and groups directly from keycloak, and avoiding any synchronization issue.
In this scenario the integration MapStore replaces the user and user-group database tables with the keycloak REST API.
Note
This integration disables reading and writing to the users' and groups' database and replaces it with the Keycloak REST API, with read-only support.
For this reason we suggest to disable the UserManager, GroupManager plugins, and remove the authenticationProviders entry of type geostore, if any, because the standard login with username and password is not allowed for the db users.
In case of integration with GeoServer, also GeoServer should be connected to Keycloak for users, and not to the MapStore database.
Configure direct integration with keycloak
To enable the direct integration with keycloak you will have to:
- Create a dedicated client for keycloak.
- Configure
mapstore-ovr.properties - Activate the functionality via system property
1. Create a dedicated client for keycloak
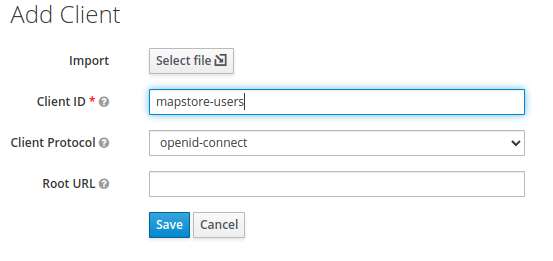
- Create another client on keycloak, in the same realm of
mapstore-serverandmapstore-client(where present) calledmapstore-users:

-
Configure it with:
-
Access Type:
public - Implicit Flow Enabled Set to on On
- Valid Redirect URIs with your app base URL, with an ending
*, e.g.http://localhost:8080/*.
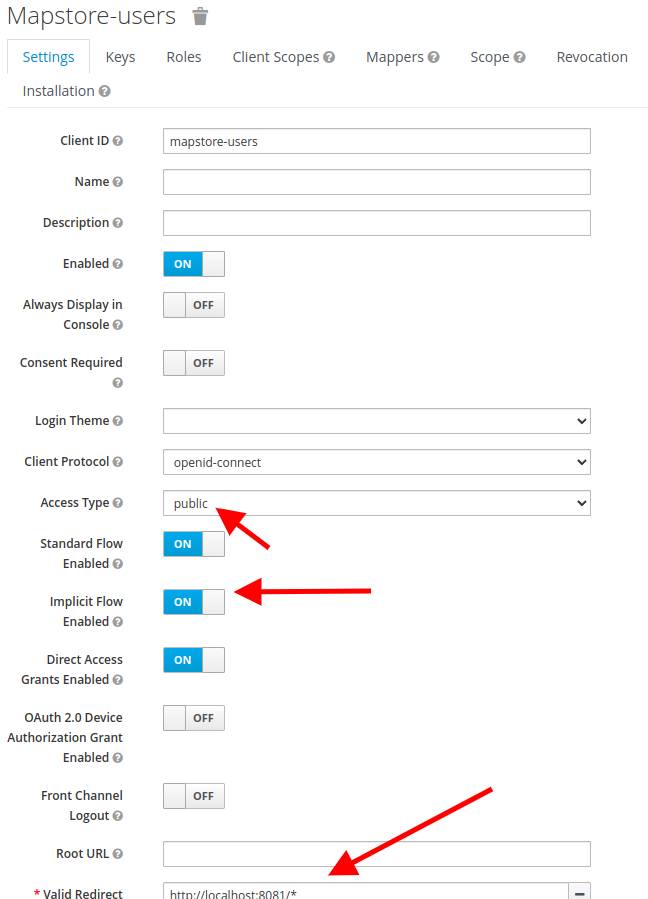
And click on Save.
2. Configure mapstore-ovr.properties
The autoCreateUser option must be set to false in mapstore-ovr.properties.
keycloakOAuth2Config.autoCreateUser=false
Moreover in mapstore-ovr.properties you have to add the following information (replacing <keycloak-base-url> with your base keycloak base url):
## Keycloak as User and UserGroup repository
keycloakRESTClient.serverUrl=<keycloak-base-url>
keycloakRESTClient.realm=master
keycloakRESTClient.username=admin
keycloakRESTClient.password=admin
keycloakRESTClient.clientId=mapstore-users
Where:
serverUrl: URL of keycloak, (e.g.http://localhost:8080orhttps://mysite.com/)realm: the realm where the client has been createdusername,password: credentials of a user with the role toview-users.1
Note
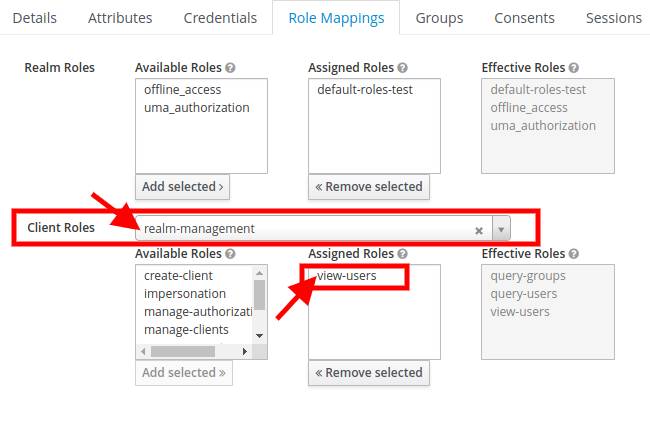
1 In order to query the keycloak REST API, you need to have in your realm at least one user with
realm-admin role permission. Usually the administrator of the realm has these permission. To associate these
permissions to a new user dedicated to this purpose, you have to open "Role Mappings" tab of keycloak and in "Client
Roles" select realm-management (or in master realm select master-realm) and add to selected realm-admin.
3. Activate the functionality via system property
In order to activate the integration in your instance, you will need to set the Java System Property security.integration with the value keycloak-direct.
One easy and usual way to configure this system property in Tomcat is using the JAVA_OPTS. Like you do with datadir.location, you can set it by adding to JAVA_OPTS variable the entry -Dsecurity.integration=keycloak-direct.
Note
For old projects or in case you can not set the system property, you can anyway configure it by adding this section to your geostore-spring-security.xml file.
    <bean
        id="keycloakUserGroupDAO"
        class="it.geosolutions.geostore.services.rest.security.keycloak.KeycloakUserGroupDAO">
        <constructor-arg ref="keycloakRESTClient"/>
        <property name="addEveryOneGroup" value="true"/>
    </bean>
    <alias name="keycloakUserDAO" alias="userDAO"/>
    <bean
        id="keycloakUserGroupDAO"
        class="it.geosolutions.geostore.services.rest.security.keycloak.KeycloakUserGroupDAO">
        <constructor-arg ref="keycloakRESTClient"/>
    </bean>
    <alias name="keycloakUserGroupDAO" alias="userGroupDAO" addEveryOneGroup="true"/>
    <alias name="externalSecurityDAO" alias="securityDAO"/>